The secrets to nailing the ultimate retro dessert
Retro favourites like profiteroles and eclairs are making a welcome comeback. Luckily, choux pastry isnÔÇÖt as hard as you might thinkÔÇŽ

Pastry lore will have you believe that the path to perfect choux pastry is treacherous, littered with potential slipups. However, once youÔÇÖre familiar with the process you wonÔÇÖt understand what all the fuss was about, and you can go on to make my perfect profiteroles, as well as other after-dinner treats.
For instance, you could make them larger and coat in chocolate to become Dutch bossche bollen, pipe lines instead of blobs to make ├ę│Ž▒˘▓╣ż▒░¨▓§, or add cheese to create savoury ▓Á┤ă│▄▓Á├ę░¨▒▓§. You could even make Paris-Brest filled with chocolate and vanilla cream.
Choux comes from the French word ÔÇścabbage,ÔÇÖ because once baked, the pastry puffs up into a crinkled little ball, much like a cabbage. Made simply with flour, water, butter and eggs, choux pastry is cooked twice ÔÇô first on the hob, then in the oven where it magically puffs up using only steam as a leavener.
At some point during your profiterole journey, you may well think everything has gone sideways. DonÔÇÖt fret, most of the time youÔÇÖre doing everything right, it just looks wrong ÔÇô trust the process and keep going. However, there are a few pitfalls to avoid, so letÔÇÖs walk through the processÔÇŽ
Prep the ingredients
The process is so quick, you really want to be completely ready before you begin cooking. Dice the butter in advance so it can melt quickly. Sift the flour onto a sheet of parchment paper and set it next to your hob. It will help it incorporate into the dough while avoiding lumps and make it easy to pour in a steady stream.
Cooking on the hob
Heat the water, milk, sugar, salt and butter and cook gently until the butter has melted, and then bring up to a rolling boil. IÔÇÖve used milk as well as water as the extra proteins and sugars in the milk help the pastry to brown nicely.
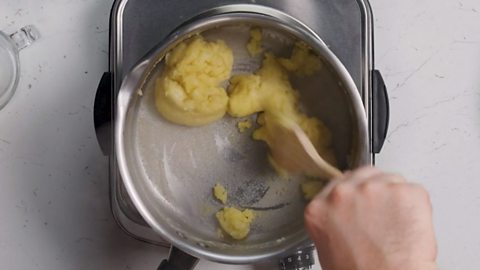
Remove the pan from the heat and pour in the flour from your paper in one big stream. Stir together to form a dough, or ÔÇśpanadeÔÇÖ as the French call it. It may look like scrambled eggs at this stage ÔÇô but thatÔÇÖs fine.
Potential pitfall: Undermixing
Keep mixing ÔÇô you have to ensure all the flour is well combined, otherwise youÔÇÖll end up with cracked shells. Taking the pan off the heat when you add the flour helps to keep it from lumping. If youÔÇÖre confident making choux, you can do this over the heat, but when youÔÇÖre starting out there's nothing wrong with going slow and steady.
If you've taken the pan off the heat, it needs to go back on for a couple of minutes. We need to ensure weÔÇÖre cooking the flour to the correct temperature so that the starch granules in the flour absorb the liquid, gelatinise and form the gluten to help to support the structure of the bun as it puffs up in the oven.
Potential pitfall: Under-cooking the panade
Look for when the dough comes together to form a ball that comes away cleanly from the sides of the pan and a film forms on the base of the pan. My tip is to use a stainless-steel pan so that you can easily see when a film is forming (tricky with a non-stick pan). If you have a thermometer, you can check when the panade is ready, it should reach 74-79C. But the skin on the bottom of the pan is a good indicator that the dough is fully cooked.

Adding the eggs
Tip the dough into a bowl and beat it to reduce the temperature so the eggs donÔÇÖt cook when they go in. You can use a wooden spoon or electric mixer, it doesnÔÇÖt matter which, but it may take a little longer by hand.
Potential pitfall: Eggy pastry
ItÔÇÖs essential you donÔÇÖt rush this step. The mixture has to be cool enough so that the eggs donÔÇÖt start to cook when you add them, otherwise youÔÇÖll end up with a very eggy pastry.
Beat the eggs in a jug and add them a little at a time. To get the correct consistency youÔÇÖll need to add enough egg to make a dough that is slightly glossy. The number of eggs isnÔÇÖt consistent when making choux pastry (it depends on how much water evaporated during the cooking stage) so add just enough until you have a smooth dough but not a runny batter.
Potential pitfall: The dough is too runny
If your dough looks too runny, step away from the flour! Instinct tells us to add more flour to firm it up, but donÔÇÖt. The flour needs to be cooked first, so adding raw flour at this stage will only make matters worse. Instead, make a new half-batch of the panade. Beat this mixture to cool it, and then gradually add it to your runny mixture until you have the correct consistency.
ÔÇŽ. or the dough is too dry
If youÔÇÖve added the eggs and itÔÇÖs still very stiff and not glossy, donÔÇÖt worry. A little too much moisture has cooked out. Just add more beaten egg a little at a time and it will come good.
HereÔÇÖs a useful way to tell when youÔÇÖve got the dough spot on ÔÇô it's called the V test. Lift the dough from the bowl with your spatula: it should form a V-shaped ribbon as it falls off the spatula. With my recipe, that generally means two large eggs, but go slowly with adding the second egg.
Edd Kimber's guide to making perfect profiteroles
Piping
If you refrigerate the dough for a few hours before using, it thickens the pastry, making it easier to pipe into neat circles. You can transfer it to a piping bag to chill, just make sure itÔÇÖs sealed so a skin doesnÔÇÖt form.
To bake the choux pastry, pipe onto parchment lined baking trays. Drawing 3cm circles on the back of the paper gives you a great template and helps keep them a consistent size. Next, glazing with beaten egg gives a lovely shine and helps them to expand fully, or simply dust with icing sugar.
A good tip is to moisten your parchment with a little water ÔÇô this additional moisture will help the choux rise properly and prevent the pastry drying out before itÔÇÖs had a chance to rise to its full potential.
Baking
The proteins in the eggs will start to set as they are exposed to the heat in the oven, giving the pastry its firmness. As the dough bakes, the water will start to evaporate. This creates steam which pushes up the dough and causes it to puff out. Eventually little bubbles of gas will escape, but the dough is so flexible that it will join back together ÔÇô giving the pastry its unique ÔÇścabbageÔÇÖ like appearance. The Maillard reaction (the process that sees sugars and proteins to break down and caramelise when heated) also kicks in at this stage, turning the pastry a light brown colour.
Potential pitfall: Soggy or collapsed profiteroles
The choux pastry must set fully in the oven ÔÇô the humidity trapped inside the hollow interiors will soften the crisp outer shell given half a chance. Once they are baked to a golden-brown, open the oven door to briefly release any steam. Turn off the oven but leave the choux buns in there with the door ajar to cool down slowly. Give them around 30 minutes to ensure the shells stay dry as the moisture inside dissipates.
And youÔÇÖve done it!
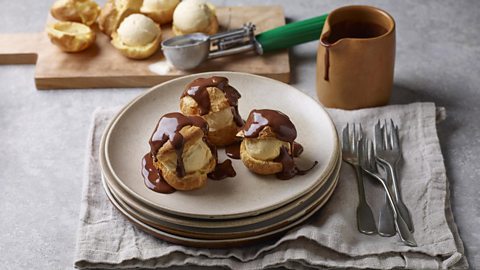
Once youÔÇÖve got your perfect little profiteroles, you can slice them in half and fill with a scoop of ice cream. Or you can make a small hole with a knife in the bottom of the profiterole and pipe in whipped cream or cr├Ęme p├ótissi├Ęre. Even better, they freeze (unfilled) until you are ready to eat. Pop them in a hot oven for five minutes to defrost and crisp up, then fill them as if they were freshly baked.
Edd Kimber's quick chocolate sauce is perfect for pouring on your profiteroles
Top with an easy chocolate sauce ÔÇô pouring it at the table will cement your reputation as a proper pastry chef. Feel free to switch up the fillings and sauces: fill with chocolate spread and cover with a mocha sauce, or fill with a cr├Ęme p├ótissi├Ęre and top with a salted caramel sauce.
Now make:
Originally published April 2023