Chocolate cadeaux
This is not for the faint-hearted. Only the most dedicated chocolate-lovers need apply for this tremendous multi-layered concoction.
Equipment and preparation: You will need a set of 8 x 30mm/1¼in cylindrical silicone moulds, 1 x 4.5cm/1¾in cutter and 1 x 6cm/2½in cutter, 8 x 20cm/8in long rainbow-shaped pieces of acetate, a set of free-standing cone moulds, 1 x 20cm/8in square piece of acetate, and a digital thermometer.
Ingredients
For the rum-soaked sultanas
For the crème brulée
- 250g/9oz whipping cream
- ½ vanilla pod, spilt lengthways and seeds scraped out
- 60g/2oz free-range egg yolks
- 50��/1¾�dz� caster sugar
For the flourless chocolate sponge
- 100g/3½oz free-range egg whites
- 90��/3¼�dz� caster sugar
- 130g/4½oz free-range egg yolks, beaten
- 30g/1oz cocoa powder, sifted
For the orange compôte
- 150��/5½�dz� orange juice
- ½ vanilla pod, spilt lengthways and seeds scraped out
- 20��/¾�dz� caster sugar
- 2g pectin
- 2 oranges, peeled and segmented, all pith removed
For the tempered chocolate decoration
- 500g/1lb 2oz dark chocolate (at least 60% cocoa solids), finely chopped
For the dark chocolate mousse
- 75��/2¾�dz� milk
- 75��/2¾�dz� whipping cream
- 40��/1½�dz� egg yolks
- 20��/¾�dz� caster sugar
- 165g/6oz dark chocolate (at least 66% cocoa solids), finely chopped
- 200g/7oz whipping cream
- cocoa powder, for dusting
- gold leaf, for decorating (optional)
Method
For the rum-soaked sultanas, wash the sultanas under warm running water to soften the skins, then place into a container with the dark rum and allow to soak for several hours or, ideally, overnight.
Preheat the oven to 140C/275F/Gas 2.
For the crème brulée, place the whipping cream and vanilla seeds in a medium saucepan and warm through.
Place the egg yolks and caster sugar into a large glass bowl and whisk until light in colour. Add the warm vanilla cream onto the egg mixture, stirring until smooth.
Pass the mixture through a fine sieve into a clean bowl.
Divide the crème brulée mixture equally between 8 x 30mm cylindrical silicone moulds set in a baking tray. Pour hot water from a kettle into the baking tray around the moulds so that it comes halfway up the moulds, and place in the oven for 15-20 minutes, or until the custard has set.
Allow to cool and set aside, covered, in the freezer.
Preheat the oven to 180C/350F/Gas 4.
For the flourless chocolate sponge, place the egg whites in a clean glass or metal bowl and whisk with an electric hand-held mixer with a whisk until soft peaks form when the whisk is removed.
Gradually add the sugar until a stiff meringue is formed, then fold in the beaten egg yolks and the sifted cocoa powder.
Pour the sponge onto a non-stick baking mat or baking tray lined with non-stick baking parchment and spread out to an even thickness of 1cm/½in using a palette knife.
Bake for 12-14 minutes, or until springy to the touch, then remove from the oven and transfer onto a wire cooling rack.
Once cooled, cut the sponge into 8 x 4.5cm/1¾in discs and 8 x 6cm/2½in discs and set aside.
For the orange compôte, place the orange juice and vanilla pod and seeds into a small saucepan and heat gently.
Mix the sugar and the pectin together in a small glass bowl.
Add the sugar and pectin mixture to the warm orange juice and bring to the boil for one minute. Take off the heat and allow to cool.
Once cooled, stir the orange segments into the orange compôte.
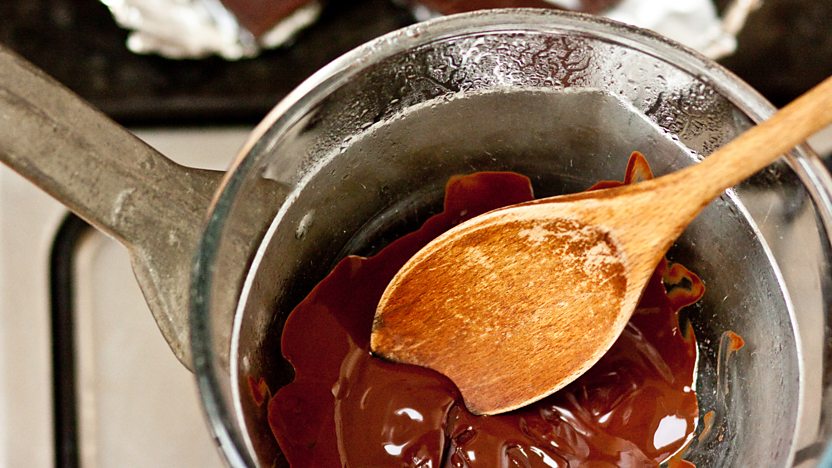
To temper the chocolate, place two-thirds of the chopped chocolate into a bowl suspended over a pan of gently simmering water (do not allow the bottom of the bowl to touch the water). Stir regularly until all the chocolate has completely melted and has reached 45-50C/113-122F.
Gradually add the remaining chopped chocolate. Stir vigorously and continue to stir until all of the chocolate has fully melted and the chocolate cools and thickens to 31-32C/88-90F. (If the temperature drops below this, simply warm it up again.)
Lay out 8 x 20cm/8in long rainbow-shaped pieces of acetate onto the work surface and spoon two tablespoons of tempered chocolate onto each piece. Spread the chocolate across the acetate evenly with a small palette knife.
As the chocolate begins to set, carefully lift the acetate by one edge and shape the acetate into a cone form with the chocolate facing inwards. Place in a cone mould to set. Repeat for all of the acetate forms.
Place a 20cm/8in square acetate sheet onto the work surface. Dip your finger into the tempered chocolate and then place it onto the acetate and push up gently to create a flick of chocolate. Repeat until you have eight chocolate “flick” decorations.
For the dark chocolate mousse, place the milk and the 75��/2¾�dz� whipping cream into a saucepan and bring to the boil.
Whisk the egg yolk and sugar in a bowl until smooth and light in colour. Pour half of the milk and cream over the egg mixture and mix thoroughly, then pour the mixture back into the pan and cook over a low heat, stirring continuously, until the mixture thickens and coats the back of a spoon.
Place the chopped chocolate in a large bowl. Pass the custard through a fine sieve into the bowl of chocolate, stirring until it is a smooth consistency.
Whisk the 200g/7oz whipping cream in a bowl until soft peaks form when the whisk is removed. Fold the whipped cream into the chocolate custard.
Place a tablespoon of the chocolate mousse into the bottom of each of the eight prepared chocolate cones. Spread the mousse up the sides so that all the chocolate shell is covered. Take the crème brulée from the freezer and place into the chocolate mousse.
Place one of the small chocolate sponge discs onto the top of the crème brulee and then top with a tablespoon of the marinated sultanas. Place another small spoon of chocolate mousse onto the sultanas and then place one of the larger chocolate sponges on top. Press gently to flatten with a small palette knife. Spread with a little more chocolate mousse and place into the fridge to set for 30 minutes
To serve, carefully remove each chocolate cone from the mould and level the surface of the top. Dust the top with cocoa powder and then with a small palette knife move onto the serving plate. Carefully remove the acetate sheet and decorate with the chocolate flick and a garnish of gold leaf.